
5 Money-Saving Tips for a DIY Bathroom Remodel on a Budget
Between tiles, tub and fixtures, the cost of renovating a bathroom can add up fast—not to mention the expense of hiring a plumber or bathroom remodeler. But what happens when your budget does not allow for this type of large-scale transformation? You decide to do-it-yourself, of course! And you get creative combining several different cost-saving methods to achieve a DIY bathroom remodel on a budget.

While it took some planning and hard work, we were able to completely remodel our small second floor bathroom for less than $1000.
Before

After

Let me tell you how we did it. Here are 5 bathroom remodel ideas for achieving a DIY bathroom remodel on a budget.
1. Keep What You Can Live With
2. Clean, Re-grout and Caulk
3. Replace Faucets, Fixtures and Hardware
4. Get Creative
5. Learn a New Skill
1. Keep What You Can Live With
Like any good remodel, our second floor bathroom started with demolition. Due to a plumbing leak and moisture issues, there was a lot of water-damaged material that needed to be removed.

However, not everything from the bathroom went into the dumpster. We decided to keep the old porcelain-enameled cast iron bathtub. It wasn’t in perfect condition, but it would have been a lot of effort to remove, only to replace it with something similar. We also decided to keep the shower tiles, which looked good aside from the stained grout lines. Classic subway tile never goes out of style and I was willing to live with the mosaic strip detail.

Think carefully about what can stay and what must go
Sometimes I think we rip out things in house renovations just for the sake of redoing something and making it ‘our own’. But if we are able to get creative with our repairs and decor choices, we might just be able to see past the fact that something is old, or not 100% what we might have chosen if we were working with a blank slate.
Save money by generating less waste
It goes without saying that the more you can keep when renovating, the less you will need to spend on new materials. But you will also generate less construction waste by keeping more of what is already there. In addition to environmental cost, construction waste will often cost you more in the form of tipping fees, or money charged for waste that needs to be put in the landfill. The larger the waste volume and weight, the higher the cost. So it makes economic sense to limit what gets removed during demolition.

Although sometimes demo waste is unavoidable. Some things just have to go!
Consider alternate access points
Another reason we might decide to rip something out is because we want to access what is behind it. In our case, we knew we had a pretty substantial leak (or two!) somewhere in the bathroom. Being able to identify and fix the issues was important. However, we were able to access the plumbing to the shower and bathtub drain and overflow by opening up the hallway wall, that way we could work on what we needed to without pulling out the bathtub or the tile. So before you start demo, remember that sometimes there are alternative access points that require less demolition.

2. Clean, Re-grout and Caulk
If you’re planning a DIY bathroom remodel on a budget, remember that a bit of maintenance can make a big difference. A few dabs of porcelain enamel paint on a chipped bathroom fixture might make it look as good as new. Instead of redoing an entire tile job, you might be able to chisel out broken tiles and replace them. And you can re-grout and re-caulk shower and floor tile to give it a fresh look, while increasing the durability and resilience to water and mold.
Sprucing up old fixtures
A good deep cleaning goes a long way. Before you decide whether to pull out an outdated fixture, try scouring it with Vim or baking soda and a non-scratch scrubbing pad to see if you can get it shining like new. This may mean the difference between whether you decide to toss something or save it from the dumpster.
Our bathroom had an old cast-iron tub that took several rounds of cleaning to get it to the point where I would actually want to take a bath in it, but I got there eventually. Still, no matter how hard I scrubbed, I couldn’t remove a worn spot where the tub met the shower tile. I initially figured the enamel was starting to wear away and shrugged it off—until I had the idea of taking a bit of fine, high-grit sandpaper (about 200 grit) to test a spot to see what would happen. Lo and behold, the spot ended up being a very stubborn bit of limescale. I was able to sand it away to reveal perfectly shiny glazing underneath.
(Note: before trying more aggressive cleaning methods like this, always test out a small spot first to avoid doing damage).
The bathtub had a few chipped spots, so I used Porc-a-fix touchup paint which mimics a porcelain enamel finish. After a few coats and light buffing with the paper provided in the kit, the chips were barely noticeable.
(*Some of the reference links provided in this article may be affiliate links, meaning that any purchase from that link would help to support my site, at no additional cost to you.)
You can also have a sink or bathtub professionally refinished (reglazed) for a few hundred dollars. For bathtubs especially, you might find that it is worth the cost of refinishing a cast-iron tub, compared to the difficulty of ripping it out and replacing with a new bathtub, which can take a large bite out of your budget.
Regrouting tile
I knew it would have been a mistake to tear out all of the subway tile in the tub/shower, only to replace it with something similar, however I wasn’t thrilled with the mildewy grout lines or the strip of mosaic tile that ran in the center of the subway tile. But, because we were doing our DIY bathroom remodel on a budget, I decided to make the best of these things by giving them both a makeover.
After scrubbing the grout with bleach and grout cleaner with no luck, I decided to re-grout the tile.
The best practice for re-grouting is to actually remove the old grout first. In retrospect, I know I should have done this, but a lack of time and patience led me to the decision to just grout overtop of what was already there. The new grout over the existing grout adhered well, has never cracked and resulted in a whiter, cleaner looking shower, but the grout lines look thicker than they did originally.

If you are re-grouting, take the time to remove the existing grout with a grout saw or scraper, ensuring all debris is removed before re-applying.
In our bathroom, I also used grout to fill holes in tile left by an accessibility bar that I removed. I made sure the grout was flush with the surface and once dried, I added Porc-a-fix to completely cover the grout spots, hiding the screw holes.
Caulking
A neat line of new caulking both freshens up the look of a bathroom, and provides a much-needed defense against creeping water. Water droplets and vapors can get into unsealed cracks causing water damage and mold issues.
This is one place where I did remove the grout. The person who originally tiled the shower added grout in the corners where the tiles meet at a right angle. However, best practice is to use silicone caulk, not grout, wherever there is a change of plane, or wherever tile meets your tub or sink. This is because houses naturally move overtime, causing slight shifts in the wall, ceiling and floors. Caulk containing silicone is a flexible protective buffer in tiled corners to allow for this contraction and expansion.

It is best to use a products specifically labelled for kitchens and bathrooms. I would also recommend selecting one that is opaque, not clear. Clear caulk tends to look wet and unfinished, showing everything that is underneath it. Luckily, products comes in a variety of colors, so try to find the color that best matches your grout. I used this product for the shower, around the cracks of the tub and the base of the toilet.
3. Replace Faucets, Fixtures and Hardware
You might be surprised at how much you can transform your bathroom simply by adding new hardware, faucets, shower heads and overflows. Making low-cost, high-impact upgrades is key for those attempting a DIY bathroom remodel on a budget. Compared to replacing the entire sink or tub unit, a few new plumbing fixtures can be much more economical.
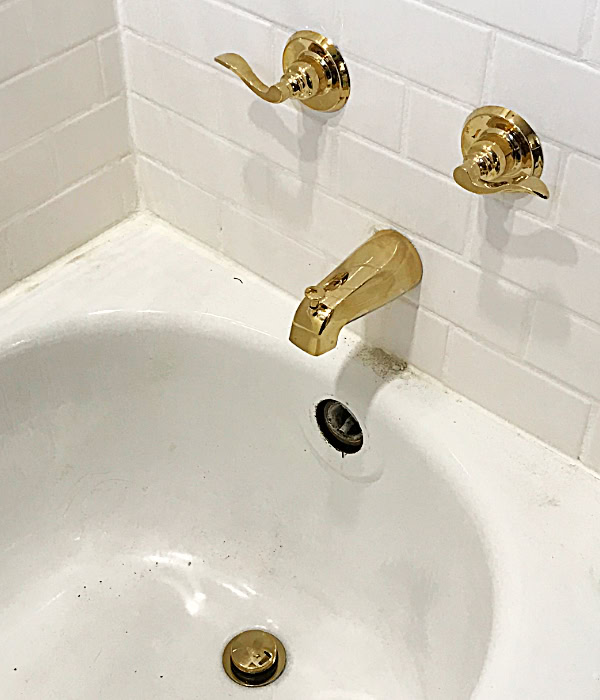
In our tub/shower, I replaced corroded chrome fixtures with a high-shine gold/brass faucet, two-handle tub and shower faucet, drain and overflow. I also replaced the chrome overflow in in the vanity with a brass one.

These replacements are pretty straightforward for any level of DIYer—just follow the installation instructions for each product. You may require a few tools/ supplies like an adjustable wrench, teflon plumbers tape and a set of allen keys.
4. Get Creative
When it comes to home renovations, what is the best way to tap into creativity? For me, the answer has always been to work with a lower budget. The less money there is to spend, the more industrious, inventive and resourceful we become.
Try this with your bathroom renovation and see what solutions you can come up with. Can something be spray painted or repaired instead of removed? Can you revamp a vanity with a new paint color or thrift materials that will allow you to save money? These are the things that ultimately make your space unique.
Using salvaged materials
When we first moved into our home, we noticed a common theme in many of the rooms: a pine, tongue and groove board that was used to create several ‘accent walls’. Every time I demoed a room, I ended up with a stack of pine panels that I didn’t know what to do with.

The answer came during our bathroom renovation when I was looking for a cost-effective covering for the walls. We had already drywalled the walls with a mold-resistant drywall board, but I was looking for a wall treatment that would cut back on the amount of drywall sanding I needed to do (always my least favorite job). The tongue and groove paneling went up quickly, held up with construction adhesive and finishing nails. After priming, I caulked the joints with an acrylic-latex filler in gray before painting it a dark peppercorn color. If you use a sealant to fill gaps, make sure the product is paintable.

Updating the mosaic tile
There was something about the strip of mosaic that divided the subway tile that I was never particularly fond of. The strip seemed too contrasting to the rest of the tile, but to take it out would have meant replacing it with an accent strip of equal height, or redoing the tile completely.

So, I decided to get creative. I took out the Porc-a-fix once again and used it to paint all the tiles that had a brownish hue. The result was an accent strip that now blends in much better with the rest of the light colored tile.
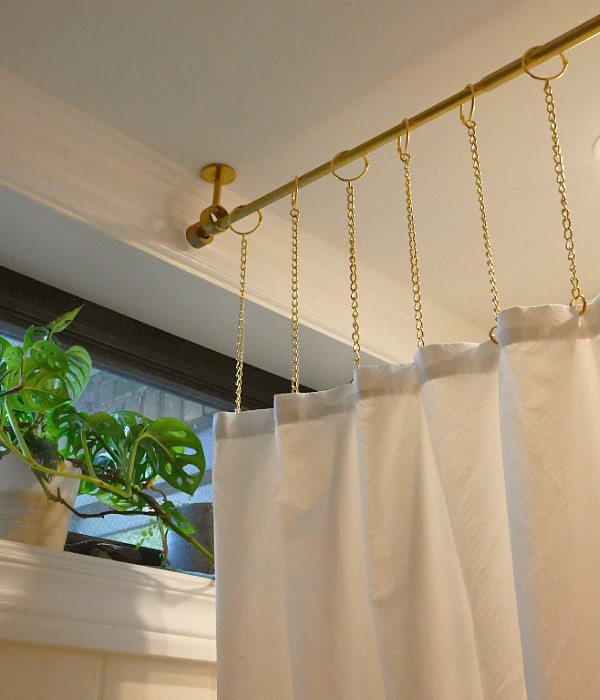
DIYing a shower curtain
When I added two pot lights in the shower as the main light fixture, I didn’t consider the fact that a high-hanging shower curtain would block this light out whenever we chose to keep the curtain closed. A high up window also complicated hanging the curtain rod at a lower height.
I knew I wanted the fabric of the shower curtain to be suspended lower so that the light could come through, however I wasn’t able to find anything that fit what I was looking for. So, I decided to DIY a drop chain for the curtain. More info on that project can be found here.
5. Learn A New Skill
A key requirement of completing any DIY bathroom remodel on a budget is the ‘do-it-yourself’ aspect. There are going to be things that you won’t inherently know how to do, but these things can be learned.
Plumbing, for instance. Renovating a bathroom doesn’t always require a plumber. Unless you want to drastically reconfigure the layout of your bathroom, or encounter major plumbing issues that you don’t feel confident fixing, the plumbing needed for your bathroom reno is probably something you can manage!
These days, there are countless tutorials online for doing all kinds of plumbing fixes. The invention of PEX, or polyethene (plastic) plumbing as a replacement to copper supply lines, and snap-on/ crimp-on fittings make it easier than ever to make connections and repair leaks.

Don’t be afraid to turn to reference books
Yes, I mean physical books that you can hold in your hands. At the start of our renovations, I would often begin a new DIY project by consulting this book from Home Depot . And this oldie, but goodie that was passed down to me from my Dad: The New Complete Do-It-Yourself Manual.
Books like these are great resources because they include clear, easy to follow diagrams. The information is from reputable sources that has been verified before publishing. They also often release new editions when there are changes to the building code or general building practices. Home DIY books are especially good if you are learning a new skill like plumbing or electrical, as you can read an entire section on those topics to get an overview of what is involved and better understand new techniques and terminologies.
With a basic understanding, you can then use online tutorials to research parts of a job more applicable to you.
Feel confident in your ability to learn a new skill. Remember that just because you haven’t done something before, it doesn’t mean you aren’t good at it— it means you are still learning how to be good at it!

Conclusion
When taking on a DIY bathroom makeover, you are in control of all aspects of the project, including your budget. Start with an evaluation of what can go and what you can save.
See if you can keep your DIY bathroom remodel on a budget by keeping as much of the old bathroom as you can. Revive old fixtures with a good cleaning. Try adding new grout, filling chips with enamel touch-up, and replacing faucets and fittings with ones you love! Scrape out old caulking and redo it with a new neat line that will allow for easy cleaning and the ability to withstand damp environments overtime.
Tackling a DIY bathroom remodel on a budget comes down to being creative and having confidence in what you can do and what you can learn how to do!
There is nothing that can beat the satisfaction of a space that is uniquely yours. Except maybe the satisfaction of doing it yourself!
Are you planning a DIY bathroom remodel on a budget? Let me know in the comments what you are planning to do!


