10 Jobs You Won’t Need a Home Renovation Contractor For
Renovating is expensive work, but it becomes even less affordable when you need to pay for both the material costs and the labor. Professional home renovation services might work for those who have a large budget and very little time to devote to renos, but an experienced, reputable home renovation contractor can be hard to find. They are often in high demand, driving up project costs, and until they start, you can never truly know whether or not they are going to do a good job.
Luckily, there are quite a few opportunities for saving money if you are willing to do the work yourself, without hiring a home renovation contractor. Here are 10 renovation jobs that you can DIY as a homeowner, and tips for getting them done like a professional!
- Demolition
- Waste Disposal
- Framing
- Drywall
- Flooring
- Painting
- Trim Work
- Kitchen Cupboards
- Basic Electrical
- Interior Design
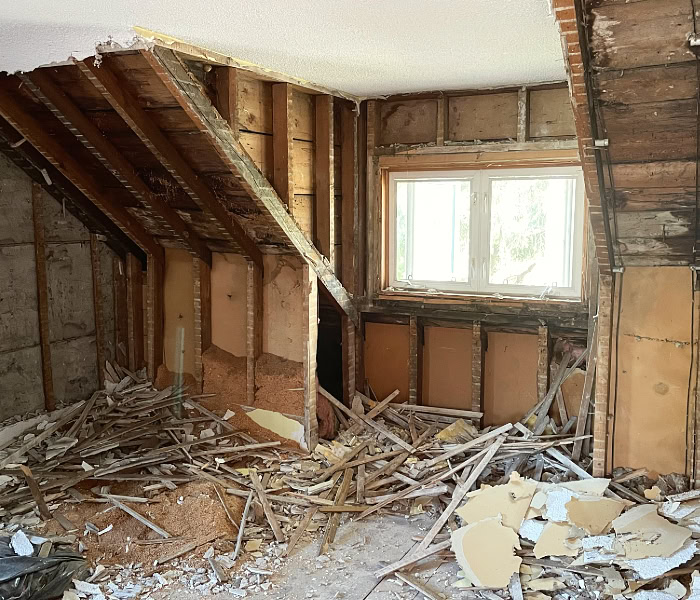
1. Demolition
Demo is probably one of the easiest areas to save money because it requires minimal skill—mostly just common sense. The primary measure of successful demo job is safety. It is best for beginners to work slowly and carefully, wearing the required personal protective equipment (PPE). It also means following safety measures like shutting off power breakers and locating emergency water shutoff valves before you begin.
Click here to read about DIY demolition tips for beginners, and a list of the 7 safety items you will need to stay safe during demo.
Demolition is usually the first stage of the renovation process, so it is a great place to start as a DIYer. It allows you to get familiar with the space you are working with, as well as any issues you might be dealing with. It also allows you to begin your renovation project with a bang—both literally and figuratively—as demo is often quick, allowing you to see a large amount of progress in a short amount of time. And although it might feel scary to dismantle a room or a whole house, it certainly counts towards progress and cost savings if you would have otherwise had to hire a home renovation contractor to do the job instead.
2. Waste Disposal
Going hand in hand with renovation demolition is construction waste: what happens to all that unwanted material generated from demo?
Bin It
For larger demo jobs, the answer is usually to rent a construction waste bin. These bins come in a variety of sizes, from 6 to 40 cubic yards, so you can size it according to the job you are completing. Estimating the size of the bin you’ll need can be a bit tricky, but generally speaking, a 30 cubic yard bin would be sufficient for a one-room job, like a kitchen demo, while a 40 cubic yard bin would be better for a multiple-room project.

These bins are usually dropped off on a driveway or front lawn. In cities where outdoor space might be limited, it can be possible to have them temporarily placed on the street, although you do have to apply to the city to request blocking the public right of way. (If you live in Toronto, that application can be found here).
Rental rates for these bins depend on the size, but they usually start at a few hundred dollars for a weekly rental. Each size of bin comes with a weight cap. It is possible to be charged extra if you exceed the weight restriction.
Bag and Bring It
For smaller jobs, you might be able to haul the waste away yourself. Loose debris can be placed in construction waste bags and brought to your local waste disposal center for a small fee. You can even bring in larger items like old cabinetry, framing or sheet goods if you have a means to transport them. Sometimes, it’s worth renting a small truck or van to make a couple of drop-offs if it’s a smaller-scale project.

Repurpose It
One of the benefits of doing your own demo is that you can sort through materials as you work, making it easier to dictate what goes into the trash. When you take the time to demo a space, you will likely come across materials that can be salvaged, metal that can be recycled, or items that can be given away to neighbors.
3. Framing
Construction framing involves building a part of the house structure. But despite how it sounds, it is not necessarily something you will need to hire a home renovation contractor for. Learning basic framing will not only save you money, it can quite literally open up doors on your renovation project!
Some form of framing is needed for almost all renovations, even when the scope of the project is small. When changes are made to the layout, doorways are moved, and closets are created—framing will be required. It can also be used for things like adding depth to a wall to accommodate insulation, something that old houses are often lacking.

Methods of construction vary depending on the region where you live, but in Ontario, residential interior framing is primarily done using dimensional lumber (2x4s, 2x6s, etc.) This is for a few reasons: pine wood is relatively cheap and abundant; it is strong, yet easy to work with (ie, cut, and fasten with nails or screws); and when used for exteriors, it allows room for insulation, while having a higher thermal resistance (R-value) than other structural materials.
A framed wall is quite simple, consisting of a horizontal 2×4 on the top and bottom of the assembly called the top plate and the sole plate. The top plate is often doubled to carry the load of what is above it, and to help tie into adjoining framing.
Between the horizontal plates are vertical 2x4s, or studs, arranged 16″ apart. When this arrangement of studs is interrupted by the placement of an opening such as a door or window, additional vertical supports are needed to make up the structure. These additional vertical studs are called a king stud and jack stud, which are arranged on either side of the opening, and cripple studs to replace the original studs that were removed.
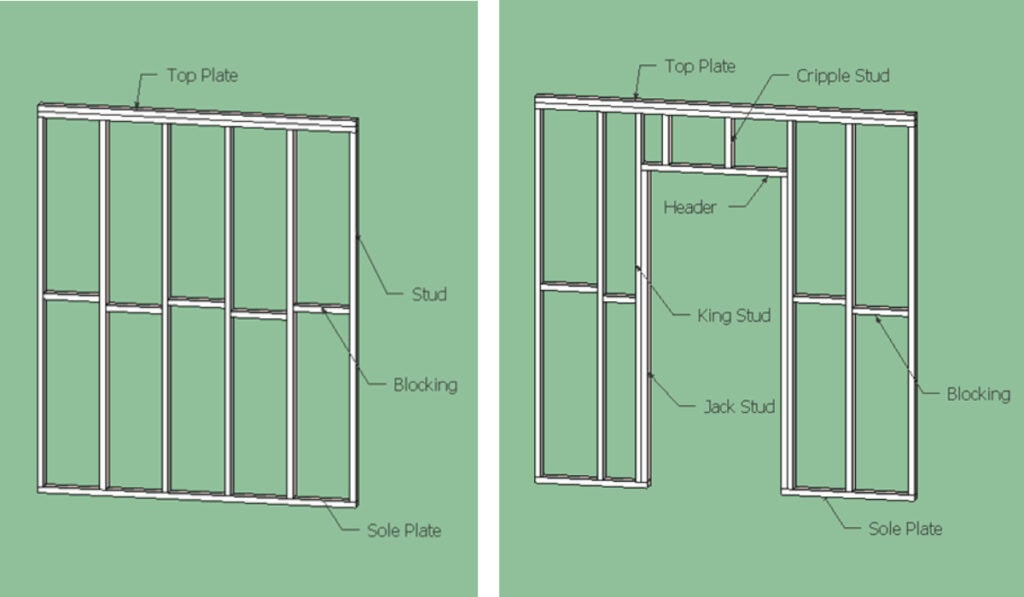
It is also common practice to add pieces of horizontal blocking between the vertical studs for approximately every 4 feet of wall height. This adds strength and rigidity to the wall and a solid backing for drywall. They are staggered so that they can be fastened from the back side of the studs they sit between.
Framing Like a Pro
The easiest way to build framing is by assembling it on the ground and then raising it into place. This is because the ground provides a flat surface to work, ensuring that the front edges of the framing are aligned with one another. It also provides easy access to all sides of the assembly so you can nail/screw the studs in from underneath the sole plate and above the top plate. Once built, tilt upward into place and secure it by ‘toenailing’ the sole plate to the floor.
And here’s a pro tip: when doing framing, think of what you’ll be hanging on your walls—it might save you a lot of trouble down the road to add some extra blocking where you want to mount something that requires more support like shelves or a handrail for a staircase. And if you’re thinking of adding baseboard, do yourself a favor and double up your sole plate to give your baseboard something to hang onto.
4. Drywall
When we talk about doing drywall in a home, we are generally referring to two different aspects of the job: hanging the drywall sheets and the plaster work involved in getting the walls to the finished stage. Arguably, one of these is easier than the other, less time-consuming, and requires much less finesse. Can you guess which one?

Hanging Drywall
Hanging drywall is usually the easier part of the drywall process, especially if you have two people involved. Although the 4 x 8-foot sheets can be a bit heavy and awkward to lift, two people can make short work of a room, fastening the sheets to 2×4 framing.
There are a few things that can increase your success as DIYer hanging drywall:
- Use the right size screw, usually 1-1/4″ black drywall screws. Space screws about 16″ apart horizontally (so that they fall on a stud) and about 12″ vertically.
- Use a drywall dimpler bit in your screwdriver to drive the screws to the optimal depth so they can be covered with drywall compound.
- Check that the framing you are attaching to is plumb and can support the drywall. Ensure that all edges of the drywall are supported and can be attached with a screw at least 3/8″ from the edge of the drywall.
- Make sure the edges of drywall boards meet one another well to prevent visible valleys or ridges once the plaster work is done.
- Use the right thickness of drywall to meet fire codes (usually 1/2″ thickness, but this can differ due to geographical region and placement within the house, so check your local building code).

Edges of drywall should be supported by studs and attached with screws at least 3/8″ from the edge.
While it is possible to hang drywall alone, it is much more difficult. Ceilings are especially tricky due to the awkwardness of having to support the weight of the drywall while fastening it, so having two people to do the job will make things much more manageable. You might also consider renting a drywall lift for the day or using lighter 3/8″ drywall on the ceiling instead of 1/2″, if fire rating allows.
Mud, Taping and Sanding
Then comes the part that takes more time and patience: mudding and taping, along with lots of sanding. Mudding and taping is the process of adding drywall compound to cover up the joints and the screw holes in the drywall. For the joints, this is done by applying a paper or mesh tape into a bed of drywall plaster and covering it with coats of drywall plaster, sanding at the end so that the joints and imperfections are no longer visible after painting.
This is seen as the difficult part of drywall because it is time-consuming. It usually takes three coats of plaster to a joint, allowing the compound to dry in between. This means that even a small room will take multiple days of work. This is also what makes it very costly to have done by a professional.
If you are going to attempt your own mudding and taping, good for you! Drywall is one of the areas of home renovation where you can save a lot of money by doing it yourself.
But be careful; rushing through it can make a bad renovation job instantly apparent. Take your time and watch instructional videos to help you learn the techniques. It can take a bit of practice to get a feel for it, so it is always good to start in a place that isn’t instantly visible when you walk into a room, like a closet.

The first coat of plaster is thin in diameter, usually just 3 or 4 inches to cover the tape. The subsequent coats of plaster use a trowel that increases in diameter (8-10″ for the second coat, 12″ for the third) and a slightly thinned-down plaster, sanding between each coat with 120-grit sandpaper or a damp sponge. The idea is that with each round of plaster and sanding, the joint will become less detectable, making the wall appear seamless once painted.
Applying even coats, scraping without leaving ridges, and sanding just enough between coats will help to achieve a successful result. A headlamp like this can be helpful when doing a final sanding, as a good source of light will help you see any unwanted texture that should be sanded smooth before primer is applied.
*Please note that some of the reference links provided in this article may be affiliate links, meaning that any purchase from that link would help to support my site, at no additional cost to you.
5. Flooring
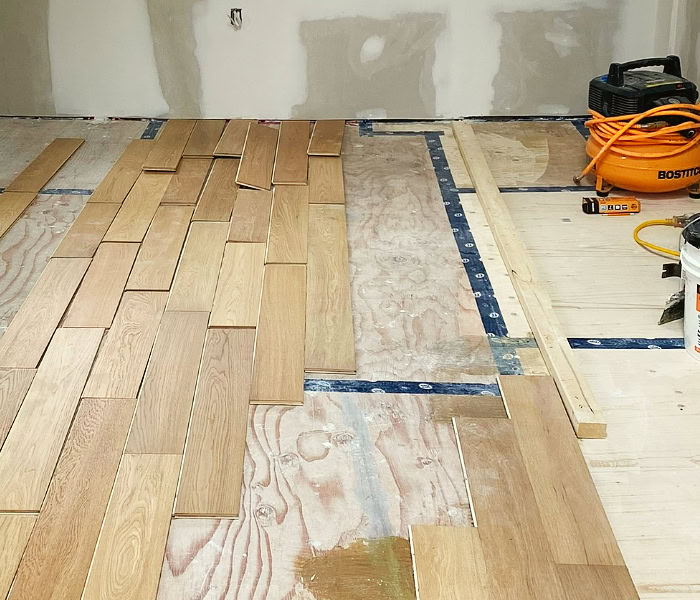
Today, there are many options for hardwood and engineered flooring available in a variety of styles. Not only does flooring today look good, but it is also designed for the average homeowner to install themselves. So, before you enlist the help of a home renovation contractor, try your hand at installing it yourself.

If you are working with hardwood or engineered flooring, you will need a miter saw to cut the pieces to size and a flooring nailer, which drives the nail at an angle into the edge of the flooring. You will also need a smaller brad nailer for face-nailing a few courses of flooring at the edges of the room or in the tight spots where the flooring nailer can’t be used.
Because these are pneumatic nailers, they will need to be connected to an electric air compressor. While a miter saw and brad nailer (electric or paired with the air-compressor) are tools that are needed all the time for home improvement, any time you need a tool you don’t expect to use very often (like the flooring nailer), check your local hardware store to see if it can be rented instead.
Tips for Flooring Like a Pro
With the right tools and a few tips, flooring is absolutely a job you can do without having to hire a home renovation contractor. Here are some tips to make your flooring job look professionally done:
- Make sure the subfloor is flat and level before starting. This may involve removing some of the subfloor to make adjustments to the underlying floor joists. Where joists are high, use an electric planer to level the high spots. Where joists are too low, sister on a length of 2×4 that sits at the desired height and secure it to the joist with construction screws.
- In many old houses, the subfloor is tongue-and-groove wooden planks, which is fine to use as long as it isn’t warped or damaged. Replace any bad sections with plywood of the same thickness.
- Screw down all subfloor sections well so that nothing squeaks when you step on it!
- Clean the subfloor and vacuum so that any glues or adhesives you are using will adhere well.
- Choose the orientation of your flooring. Screw down a temporary straight edge that the first course can be nailed against. This is usually done a few floorboards’ widths in from one side of the starting wall.
- Check the manufacturers’ recommendations for gluing and nailing. Some flooring types require a full glue under each board as well as nails; some require just nails, a ‘glue-assist’, or a perpendicular bead of glue every 6 inches or so. The manufacturer may also specify whether it is best to use nails, staples, or flooring cleats, which are slightly serrated and have a hooked nail head.
- If you have several boxes of flooring, open multiple boxes and select from different boxes as you work. When working with wood, there can often be color variations between boxes, so it is good to mix them up well to avoid ‘chunks’ of a certain wood tone.
- For a professional look, it is best to avoid having two joints fall next to one another. Try to keep joints staggered, at least the width of a floorboard away diagonally from the last joint. Professionals also like to avoid “H” joints, which occur when two floorboards have a close-together joint, even if there is another floorboard between them. Lay out your flooring in advance, a few rows at a time, to give yourself time to arrange them before applying the glue.

even if there is another floorboard between them (“H” joint)
- When gluing, it is good practice to also use a special tongue and groove glue on the abutting ends and the tongue of the boards.
- When using the flooring nailer, practice on some scrap pieces of flooring first. Keep the nailer pressed down securely when hammering so that it doesn’t ‘jump’ and drive the nail into the top of the board instead of the edge.
- Use a flooring jack to pull together flooring at the edges of the room that can’t be hammered with a mallet to tighten gaps. Face nail using the brad nailer in tight spaces where the flooring nailer can’t be used.

6. Painting
If you have decided to do your own home renovations, you’re likely going to get very good at painting because there is a lot of it!
Unless you’re big into wallpaper, painted surfaces will account for roughly 75% of your home. That’s what makes it such a great place to save money when it comes to home renovations. Doing your own painting is one of the easier skills to learn and it will save you thousands by not having to hire someone else to do it.
Tips for Painting Like a Pro
That said, rushing a paint job can really show. Take your time at the beginning to learn a few techniques that will make every day of painting easier down the road. Once you get the hang of it, you’ll be able to put some music on and let your mind wander as you paint on autopilot.

Here are some tips for a professional paint job:
- Buy a good quality paint. Ask the staff in the paint department of your local hardware or paint store what they recommend. Good quality paint should provide excellent, even coverage and should never require more than two coats, which is not what can be said about cheaper, thinner paints.
- Be sure to select the right paint finish for the job, or in other words, the right amount of gloss for what you are painting (more on this below).
- New drywall should be painted first with one coat of drywall primer before you add any paint. From there, two coats of your high-quality paint should be all that’s needed to provide a good finish.
- When painting walls or ceilings, paint one section at a time, working in about 6-foot stretches. Cut in with an angled brush around the perimeter and obstacles like switches and outlets. Cutting in is done to get the spots the roller can’t get to, and only needs to be a few inches wide, usually the width of your brush. Use a clean 9″ roller to paint the remainder, slightly overlapping your edged brush line to blend it in.
- Check for ridges, drips and brush strokes as you go, blending them in as much as you can.
- Be careful not to overfill your paint tray, leaving the ridge part of the tray for removing excess paint from the roller. The roller should be fully coated with paint, but should be rolled off just enough that it won’t drip when you lift it to the wall.
- Take the time to remove switch plates and outlet covers before you begin, as brush strokes tend to be easily visible around them. Use painters tape to protect anything else that needs to be painted around that can’t be removed.

Finishes
It is worth taking a minute to talk about paint finishes because it can mean the difference between a job that looks professionally done and one that doesn’t.
There are different paint finishes that you can select, with some paints drying shinier than others. The level of shine or gloss should be selected according to what you are painting, with high gloss reflecting more light, making flaws and bumps easily visible, and matte paint absorbing more light, making flaws less visible.
- High-gloss paints are the most reflective and therefore show the most flaws in what you are painting. These finishes work well for small details that you want to stand out like ornate trim, or your front door. A high gloss is best applied with a paint sprayer because brush stroked tend to be more visible. Gloss paints are also easier to clean than matte paints.
- Semi-gloss and satin are the finishes preferred most often for trim work. Satin will be less prone to brush strokes and will be less likely to show flaws like nail holes that haven’t been perfectly filled. Semi-gloss shows more flaws, but allows trim to make more of a statement, especially when paired next to a matte ceiling. Satin is usually also the preferred choice for cupboards and furniture.
- Eggshell is the best paint for walls. It is just matte enough to conceal flaws, with a hint of sheen that still reflects light and allows it to be wipeable, preventing stains.
- Matte finishes are perfect for ceilings. Because there is not usually a lot of visual interest happening on the ceiling, we want to direct the eye downward to the rest of the room. Even a bit of sheen on a ceiling will draw the eye to any unevenness or inconsistencies, so a highly matte finish tends to be the best option.
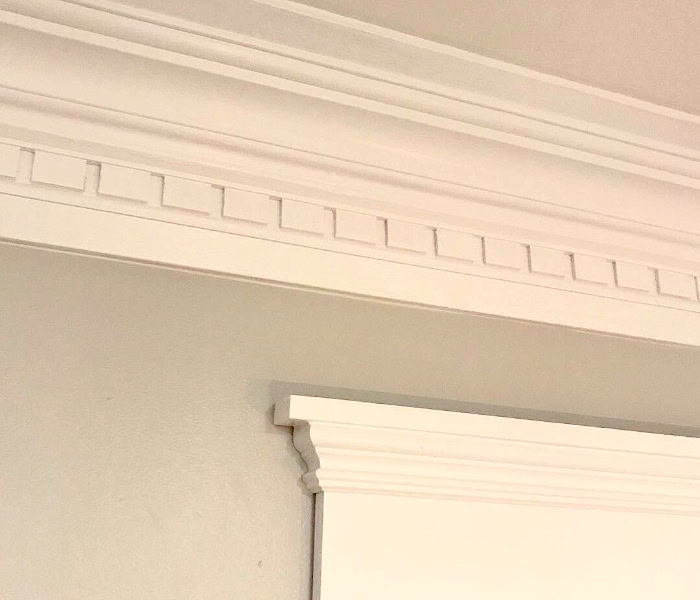
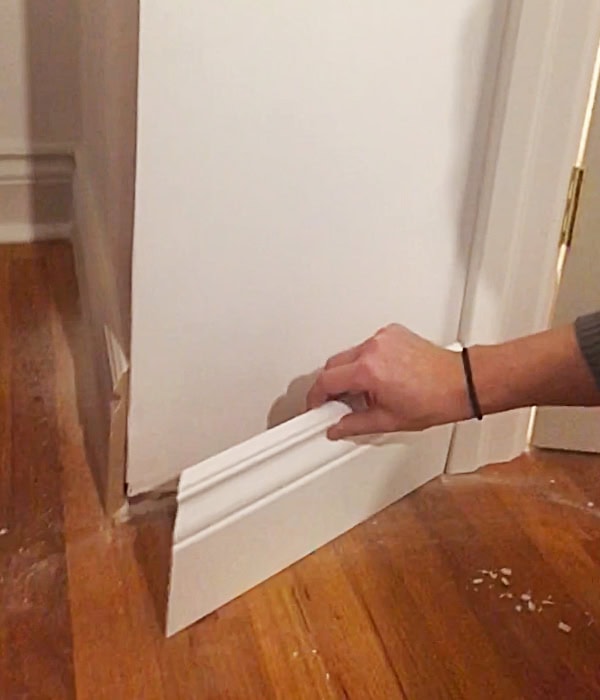
7. Trim Work
Want to know how to elevate a basic-looking blank slate room into a more dressed-up, professionally finished space? Add trim like baseboards, door and window casings, and crown molding.
While some more modern homes choose to go trimless, opting for a more modern look, if you have an older home, chances are that you will want to enhance your home’s original character by incorporating some trim. Trim was a staple of older homes. Well-preserved century homes are treasure troves of meticulously crafted hardwood casings and 12-inch high baseboards. Too often, older homes that have undergone multiple renovations have lost their original trim to the unscrupulous renovator who failed to see its value.
For those and other spaces lacking trim work, it can be fun to see it added back in. But paying a carpenter to perform this task can come with a high price tag, with this type of work starting at around $100/ hour for labor alone.
Luckily, installing your own trim is not too difficult and is one of the more rewarding home improvement tasks, as a day’s work can transform the look of a space. The cost of materials can add up though, so be sure to price out what trim you want and do your math for how much you will need. Once you start trimming out ceilings and doorways, you may feel the need to continue through the whole house to give it a cohesive look.
Materials
The easiest and most cost-effective type of trim is the kind that is painted. This is because you can use cheaper materials like MDF (medium-density fiberboard) or solid wood like poplar. When you are planning to paint the trim work you install, there is more room for imperfections because slight gaps can be filled with wood filler, smoothed and painted over and still achieve a seamless look. For beginners, I would always recommend painting trim, as working with hardwood needs to be more precisely fitted, stained, and finished, which can be a bit of an art form.

MDF is often preferred for painted trim work for a few reasons: it is more cost-effective than other materials; it is lightweight, making it easy to install; and it often comes pre-primed in white, cutting down on painting time after installation.
Trim molding, both solid wood and composite materials like MDF are commonly available at most hardware stores, coming in lengths of 8′, 10′, 12′ and sometimes longer.
Tools and Supplied Needed
If you don’t already have a miter saw, it will come in very handy for trim work. Trim work involves a bit of geometry, mostly making 45° cuts to meet to form right angles. However, the walls of older homes are not always perfectly square where corners of rooms form perfect 90° angles. A coping saw is used to cut away unwanted material to make two adjoining pieces fit together perfectly (more on this technique below). A Japanese pull saw can also be perfect for fine tuning your trim with gentle cuts that other saws couldn’t manage.
For fastening, a brad nailer is the preferred nailer because it easy to use, with nail holes leaving a minimal impact on the finished trim that can be disguised with a wood filler like this fil stick. Construction adhesives like PL Premium work well for applying to the back of the trim before nailing. A two-part instant bond glue is an extremely fast-drying glue that can be used for attaching smaller bits of trim together, ie return edges (more on this below).

Installing Trim Like a Pro
Most trim work is fairly straightforward. You measure, then cut, glue and nail. If you are installing two pieces to meet at a right angle, like casing around a window, you miter each piece at a 45° so that when they meet, they make a perfect 90° angle. But some details are not so obvious. Here are some techniques to follow to make your trim work look more professional:
Crown Molding
Cutting crown molding tends to stump the beginner carpenter because it does not sit flat against the wall. This gives what is called a spring angle, which is the angle at which the molding has to be propped up against the wall in order for it to look right. For most crown molding sold in hardware stores this spring angle is 45°. This means that in addition to a 45° miter cut, crown molding has to deal with a 45° spring angle as well, meaning that in order for the crown molding to join together, it requires a compound miter cut, or a cut with two angles. Luckily, there is an easy way to do this on the saw using just one cut.
For outside corner crown molding, start by cutting a piece of crown about 6 inches longer than it needs to be. Make a mark to show the direction you want the miter cut to go so you don’t get confused when you go to make the cut. Then turn the molding upside down, pressing it against the fence of the saw as if it were against the ceiling and wall and making the 45° cut. Finally, trim to the length that it is needed.
Inside Corner Molding
Unless an inside corner is a perfect 90° right angle, cutting two 45° miter cuts will result in gaping when you put the pieces together, either at the front edge or the back corner of the joint, which would then need to be filled with caulk or wood filler to disguise the void.
Instead, cut one piece with a straight cut and place it against the wall. Take the other piece and give it a 45° miter cut. Use a coping saw and remove everything except the front edge, cutting 45° backwards. This allows the molding to be pushed in right against the straight piece. It will still require a bit of caulking, but only a small amount will be needed to make the joint look perfect.
The same thing can be done with crown molding for an inside corner, but remember that in order to get your compound miter cut, you must turn the crown molding upside down to make your cut. Then, just like the baseboard, back-cut at a 45° angle, leaving the front edge of your molding and press it against a straight piece for a tight-fitting joint.
Molding Returns
When doing trim work, there are often places where we will need to terminate an edge of molding. While this could be done by just cutting it straight and maybe sanding or beveling the edge of it to make it look softer, there is more professional-looking way to do this.

It can be accomplished by cutting the edge off at a 45° angle and then gluing on a small 45° angled piece to return back towards the wall or into the floor. For these small pieces, using an instant bond glue to attach the return piece works better than nailing, as smaller pieces of trim are more prone to splitting when they are nailed.
8. Kitchen Cupboards
Kitchen and bathroom renovations are currently the most requested jobs for a home renovation contractor. So if you are taking on a kitchen remodel, you might find yourself competing for contractor services, receiving a quote way outside your budget for even a small kitchen project.
There are many elements of a kitchen renovation that are actually very manageable for the average homeowner. Prepping the space with framing, drywall and flooring are things that can save you thousands by doing yourself instead of hiring a contractor to do.
But one of the best ways to save money when remodeling kitchens is actually by doing one of the easiest parts of the project: by building the cupboards yourself!

Products Available
There are many options for cupboard units that are tailor-made for the average homeowner to assemble and install. Companies like Ikea pride themselves on their ease of assembly, and others are following suit. Today, most big box stores have kitchen kits akin to Ikea’s, with similar fastening hardware and simple pictorial instructions.
These kitchen systems are modular in the sense that they are sold in individual units of standard sizes, based around conventional kitchen measurements like the 36″ counter height. As such, skeleton or ‘carcass’ boxes that build the structure of the base cabinets are usually about 30″ in height for the box, and roughly 34.5″ in height after adjustable legs are added, leaving room for a 1.5″ to 2″ countertop to make up the difference.
Standard depth for these boxes is 24″, and slimmer for upper cupboards, at 18″, to allow for working room on the countertop.

Width is more customizable, but a double-doored unit commonly measures 30″ wide. Most ovens and range hood fans are also 30″ in width, so it is not by accident that the most common size of cupboard would measure accordingly. The idea behind the box-style units is that they can be arranged amongst kitchen appliances to create a simple, yet customizable kitchen layout that is easy enough for a homeowner to design themselves.
Kitchen Design
While the standard dimensions of the cupboard boxes are designed for simplicity, there is still a lot of thought that must go into kitchen design. When creating your design, make sure you start by getting accurate measurements of the space you will be working with. This means measuring the length, width and height of the space with a measuring tape more than once for accuracy. Remember to include the thickness of finishes like drywall and flooring if they aren’t installed already.
If you are adding a tile backsplash, you don’t need to add the dimension of a tile to your design measurements. Tile backsplash is added after cupboards and countertops are installed.
Computer-Assisted Design
We live in an technological age where the designs we commonly see for kitchens are beautifully rendered 3D images. AutoCAD, Revit, Sketchup and other programs are capable of extremely accurate and complex designs, but there are also ways of utilizing them to create basic plans and 3D models.

If you are interested in creating a design with the help of computer software, the program I would recommend is Sketchup. With hundreds of tutorials available online, it should only take a few hours of practice before you get good at the basics of SketchUp. It is a highly intuitive program to use, and a free online version of the program can be accessed here.
On Paper
Do not underestimate the usefulness of pencil and paper. A well drawn out design, especially if drawn to scale or on grid paper can be a wonderfully accurate ways of planning out your design. Consider using transparency paper to layer different elements of your design drawing out your plan using several pages which can be overlapped to create one design.
Free Design Help
If you do think that designing a kitchen is outside of your comfort level, be sure to fully utilize the free kitchen consultation services that are commonly offered where kitchen systems are supplied. Providers like Ikea and Home Depot offer in-store kitchen design help, where a member of their staff can help you with the process.
Installation
While some hardware stores may provide installation for their kitchen systems, it is often provided at an additional cost. Assembling and installing the cabinets yourself is a great way to save money. Assembly of the cabinet boxes usually doesn’t require many tools besides an allen key and a screwdriver. Installation, however, can be a bit more complex.

Cupboards placed on the floor should be adjusted to create a level base for countertops to be installed on. Adjustable legs can be twisted to raise and lower each corner of the unit but these legs are often made from flimsy plastic, so building a simple 2×4 support frame to set your cupboard boxes on can add rigidity. Adjustable legs can be used in addition to this.
Most cabinet systems use a steel rail that attaches to the wall that cabinets are hung off of. This rail should be secured to structural element like studs so that it gets well-fastened to more than just the drywall. A laser level is useful to ensure this rail is perfectly level.

You can also set a laser level to produce a line at 34.5″ above floor height, and adjust the legs of the cabinet units to ensure that the front and back of each of the base cabinets hit the laser line. Use a long level to check for accuracy, checking that each unit is level on its own and that the top is level with the height of other cabinets. Also check that each unit is plumb, straight up and down vertically as well.

Once cabinets are in place, use a couple 1″ screws to fasten cabinets to the ones beside them to make sure there are no gaps between them. Conceal screws at the end with screw hole covers.
Upper cabinets are commonly installed the same way, hung off of a steel rail fastened to the wall. Unlike base cabinets, the uppers do not have adjustable legs or floor supports to rely on, so it is extra important to make sure the steel rail is well fastened to structural elements and that the cabinet will rest plumb against the wall when it is hung. Spacers can be behind the cupboards as needed to ensure the cupboards are plumb against the wall.

Finishing Kitchen Cupboards Like a Pro
When the boxes for the cabinets are installed, it’s time to install things like doors, shelves, soft close hardware, handles and drawer pulls. Be sure to take your time with these finishing touches, as it is these things that will give your kitchen a professional look. Here are some tips:
- Consider using glass-paned cupboard doors to create a section of cupboards for displaying glassware like wineglasses.
- LED lighting within display (glass-fronted door) cupboards, as well as beneath upper cupboards (shining down on the countertop) can add both ambient and task lighting.

- Use finishing panels and trim provided by your kitchen system supplier in the same finish as your cabinet doors to ensure each cabinet has a finished look.
- Install kick boards to dress the base units, extending down to the floor to cover the gap.
- Paneling should also be cut to fill any gaps between cupboards and appliances. You may need to install bits of blocking behind these pieces to keep them in place.
- Once the finishing panels are installed, the original boxes should not show when the cabinet doors are closed and any gaps where food or objects could fall between or underneath cupboards should be closed.
- If there is space above your cupboards, install back blocking and finishing trim up to the ceiling to close the gap. This prevents an unusable void on top of your cupboards that collects dust. Finish with crown molding for a professional look.

- Finalize decisions for appliances before measurements for countertops are taken. Countertops should fit tightly against oven cooktops to avoid food from falling in between.
- Use a hardware jig to drill your holes for cabinet door hardware to ensure knobs and drawer pulls are perfectly inline with one another.
- Most hinges sold with kitchen systems allow you to adjust the positioning of the cupboard door. Use a phillips screwdriver to turn the two adjustment screws to calibrate the doors up or down, in or out, so that the gap between all doors is even.

- Install soft-close cabinet door, and drawer hardware to prevent slamming.
- The interior of kitchen cupboard boxes often have vertical rows of holes for the pegs which hold up the shelving. For a professional look inside the cupboards (especially for glass-fronted display cabinets) use hole plugs like these, or the ones recommended by your kitchen cupboard provider to disguise the unused peg holes.

9. Basic Electrical
If you’re lucky, you may get one of those fixer-uppers that only requires minor upgrades to electrical like changing out light fixtures as well as the odd switch or outlet. Minor electrical jobs like these can be done easily, and if you are already opening up walls and ceilings as part of your renovation, it can be worthwhile to know a few basics about wiring and electrical work so you can change any outdated electrical systems while you’re at it.
DIY Electrical
Contrary to popular belief, it is actually perfectly acceptable for a homeowner to do their own electrical work. In Ontario, according to the Electrical Safety Authority (ESA), a homeowner or occupant has the right to do the work themselves, as long as they are aware of the responsibilities and risks, adhere to the Ontario Electrical Safety Code and file the required notifications of work with the ESA. *Note, the rules may differ depending on your location.
A notification of electrical work is similar to a building permit. To file a notification, you are essentially submitting an application to notify your local electrical authority before the work starts. From there, you will need to call to book an inspection, and in some cases more than one.
Safety
Electrical shocks can pack a punch, so be sure to never touch any exposed wires or visible terminal screws on receptacles unless you are sure the power is off.

Shutting off power is done through your main electrical panel, where there is a series of breaker switches for different parts of the home. If you happen have a well-labelled electrical panel and know what breaker controls the power in the area you will be working, you can shut off just the breaker switch to the circuit you will be working on. However, if you are unsure, there is a large switch located to one side of the panel which can be used to cut the power coming into the box and feeding all of the circuits. (In the above photo, this breaker is indicated with a yellow star sticker.)
To test whether a cable is live, a safe way to check is by using a non-contact voltage tester. These are inexpensive meters that light up and make a beeping sound if a current is detected. To use, turn on and hold the tip of the tester close to the supply cable you will be working with. If the meter beeps, it means there is current in the cable that needs to be turned off before it is safe to proceed.
Wiring Basics
In North America, the main type of electrical cable used in homes is non-metallic cable (NM cable), or a product like 14-gauge Southwire Romex to distribute power around the home for things like lighting and powering electrical outlets. Within its white thermoplastic jacket, this cable contains three copper wires sheathed in plastic: a hot wire (black), a neutral wire (white) and an unsheathed copper ground wire.
Plastic wire connectors like these twist-on marettes are used to make connections between wires of the same color. Wires are also connect to the screw terminals on outlet and switch receptacles.

To make these connections, ensure the power is turned off and none of the cables you are working with are live. Use a Romex cable ripper to split the white plastic sheathing, peeling it back and removing about 8″ to reveal the 3 individual wires.
For the hot (black) and neutral (white) wires, use a wire stripper tool to remove about 1″ of the plastic insulator to expose the copper core of the wire. Make wiring connections between wires of the same color by twisting the exposed ends together in a clockwise direction using electrical pliers so that the wires won’t come apart. Twist on a plastic marette/ wire connector in a clockwise direction so that the connection is secured and none of the copper is exposed.
Replacing a Light Fixture
Replacing a light fixture is one of the most common electrical jobs in a home renovation. This is a good place to start if you are new to electrical work as it usually just involves making a straightforward connection from the cable coming from the switch to the cable in the light fixture—connecting one hot wire to the other hot wire, and one neutral wire to the other neutral wire, and connecting the ground wires to the back of the junction box.
When making the connection to a new fixture or appliance, first be sure that the power to the circuit is off. Even after the power has been shut off, it is good to use a voltage tester to confirm there is no power coming into the electrical box, coming from a different circuit. If you are unsure, switch off the power to the entire house before you start working.

Parts Needed for Hanging a Light Fixture
There are different types of brackets for mounting light fixtures to the junction box, including the single bar bracket which spans the opening of the junction box. However, a round crossbar like the one pictured below provides the most flexibility when it comes to positioning your light fixture.

The plate cover is more than just a decorative covering for the junction box; it fastens to the bracket plate to hold up the light once it is wired. Here are two common plates types that are used—one with two screws that attach through the sides of the plate to two the wings that come up from the mounting bracket:

And one where the two screws are passed through the bracket plate and hang down through the two holes in the face of the cover plate. Threaded nuts tighten on to the ends of the screws to secure the plate in place:

Most fixtures have either a ring with a threaded end which secures onto the plate for a chandelier chain to hook on to, or a threaded bolt with a tightening screw that allows you adjust the length of the wire (ie, for pendant lights)
To install your light fixture:
- Start by checking your ceiling junction box to ensure it is securely screwed to a ceiling joist and can support the weight of a light fixture.
- Screw the bracket plate into the screw holes on the face of the junction box.
- Determine what type of light fixture plate cover you will be using and how it attaches to the bracket plate. Before you wire your fixture, you will need to feed the wire through the hole of the plate cover as well as any threaded nuts, rods and rings that pass through the center hole of the plate cover. Make any threaded connections around the plate cover that are needed. Make sure that the plate is oriented correctly so that when you bring it up into place, it isn’t upside down.
- Make the wire connections: Strip wires back so that one inch of copper is exposed for each wire. Connect the hot (black) wire in the junction box to the hot wire of the light fixture (either black or smooth). Connect the neutral (white) wire in the junction box to the neutral (white or ribbed) wire of the light fixture. Connect the copper ground from the light or light bracket plate to the screw in the back of the junction box.
- Attach your plate cover to hold the fixture in place, fastening the nuts or screws needed to secure the cover plate to the bracket on the junction box. Once fastened, the cover should sit tight against the ceiling (or wall if it is a sconce light), completely covering the junction box with no visible gaps.
- Push any excess wire up through the hole of the faceplate. If your light uses chandelier chain, attach it to the ring or hook of the faceplate. If your light has an tightening screw to adjust the length of pendant cable, adjust the cable to the desired height and tighten the screw.

Avoiding Tired Arms
It is said that three hands are needed to hang a light fixture; two to make the connection and one to hold the light up. This is probably hardest part of installing a light fixture. Even if you have somebody that can provide a 3rd or 4th hand to help hold the light while you do the wiring, if you aren’t well prepped, those arms will get tired quick, especially if your light fixture is heavy. Instead, try one of these methods:
- Set up an A-frame ladder so that the top is close to where you will be wiring. Set the light fixture on top of the Iadder as you make the connection, securing it with a clamp so it doesn’t fall.
- Take some strong wire and securely attach it to your light fixture. Make sure your mounting bracket is fastened securely to the junction box, and tie/ twist the wire to the bracket to temporarily hang your light up as you work.
When to Hire an Electrical Contractor
While there are electrical jobs that the average DIYer will be capable of doing, there are times when it may also exceed your abilities. If you ever feel that wiring is out of your comfort zone or beyond your skill level, don’t hesitate to call a reputable electrical contractor.
10. Interior Design
When it comes to decor, we consume a lot of online content designed to feed a sense of want and consumeristic spending. Expansive masterpiece homes with wide open spaces, meticulously styled shelves and overstocked jar-laden pantries… While these things seem enticing, we must remember that they don’t always contribute to a sense of happiness. Decor purchased for the sake of filling space is actually just unnecessary clutter and only contributes to amount of things in the home which must be dusted, cleaned, fixed or thrown away over time.
The most interesting, visually appealing homes are the ones in which each object either has a story, or serves a purpose. The interiors of a home should meet the needs of the people living there, while creating a space that is comfortable and unique to them.

Decor
Decorating a space for beauty and functionality does not need to be overly complicated. It can be as simple as placing objects in a way that best serves how you live. Here are some tips for decorating in a way that will never go out of style:
- Choose natural materials wherever possible. Natural wood, stone and metals pair well together and create a timeless look.
- Shelves and bookcases are great for filling blank walls. They also provide the benefit of additional storage. Fill shelves with things you already own like books and other objects you have collected. Arrange objects on a shelf by creating clusters of objects with varying heights and textures to create interest. It is often visually appealing to see tall things appear in the middle of a cluster, with shorter things on the outsides.

- Taller books can be laid on their sides with object placed on top
- Use visually appealing boxes or baskets to store items that you use everyday but don’t always look nice, like assorted electronics.
- When in doubt, add a plant. Real plants look great in any space and improve air quality as a bonus. Plants like Pothos and Arrowhead are great go-tos for the serial plant-killer because they are extremely easy to care for. They can also be sprouted in water, meaning that you can create new plants from cuttings (just make sure the cutting includes root nodule, or else a new root will be unable to grow!)
- Hang artwork at eye height. If you are creating a collage of pictures, the middle of the arrangement should fall at eye height.
- Curtains rails should be hung a few inches down from the ceiling, with the bottom of curtains just skimming the floor. This elongates the room, making ceilings look taller and windows look larger.

Remember that it’s alright to have blank spaces on walls and shelves that have yet to be filled. Photo frames can have placeholder images that can be replaced with more personal photos or artwork later on. Creating a home will always be a work in progress, becoming more visually interesting the longer you live there.
Conclusion
When the thought of renovating a house feels intimidating, it may be tempting to reach out to a home renovation contractor and other professional trades to ask them to tackle it all. But if cost savings is the goal, it is important not to underestimate what you can do.
Consider your renovation as individual projects and think about how it might feel to take on each job, one at a time. You might find that there are jobs where you feel more confident doing them yourselves, without the help of a professional.
We live in an age where information is available at our fingertips, and the the answer to any DIY question is out there, all you have to do is ask. And when answers on the internet are unclear, try asking representatives at your local hardware store, and remember that you can always turn to books (!) for information. Take the time to read through the appropriate section of the our local building code. For anyone local, this means reading through Part 9 of the Ontario Building Code, which deals with residential buildings.
Taking on a home reno project that you have never attempted before isn’t easy, but it is a challenge that you might feel up for if it means saving lots of money. In many cities, the high demand for trades and home renovation contractors means that prices for even small jobs can be in the thousands. But with a bit of time and research, it is possible for the average homeowner to tackle their own home renovations and keep that money in their own homes and their own pockets.


One Comment